Everyday French Toast

It’s no secret that I’m not always a morning person. While I love some things about mornings (peaceful bike rides and sunrises), I really only like them on my terms… aka not when the alarm goes off at 5:30.

It should go without saying then, that I don’t actually make breakfast for breakfast all that often – especially on a work day. (Sorry, Andy.) Holiday weekends, however, are the perfect time to actually make breakfast – as long as they don’t require getting out of bed before I’m ready to start the day.

Enter this new method for making French toast from Cook’s Illustrated. You bake an entire cookie sheet of toast in the oven, which means you get:

a). Crispy, golden brown slices without underdone middles (mushy French toast is the worst).
b). No flipping / turning during the cooking process = no babysitting the pan, so you can wash the dishes, set the table, slice fruit, or do whatever else you’d like to do while breakfast is cooking.
c). All the slices are done at the same time, so everyone eats at the same time!

Seriously. It’s been a game-changer over here. And it doesn’t require any fancy bread, so odds are pretty good that you can make this on any morning (or evening) that you want. Win-win-win.

EverydayFrenchToast

Everyday French Toast

vegetable oil spray (I used olive oil spray, since that’s what’s in my pantry.)
3 eggs
2 teaspoons packed brown sugar
1 tablespoon vanilla
1/2 teaspoon cinnamon
1/4 teaspoon table salt
2 tablespoons unsalted butter, melted
1 cup milk
8 slices of hearty white sandwich bread (I’ve used regular sandwich bread from Aldi with no problems!) 

Arrange one oven rack in the lowest position in the oven, and place the other oven rack about 6″ from the broiler element. Preheat the oven to 425°.

Spray a large (18″ x 13″ is the recommended size from CI, but mine is slightly smaller and it works out OK) rimmed baking sheet with non-stick spray.

In a large glass measuring cup, whisk the eggs, sugar, vanilla, cinnamon, and salt together until the sugar has dissolved. Pour in the melted butter, whisking constantly, then whisk in the milk.

Pour the egg mixture onto the prepared baking sheet. Place each slice of bread on the sheet, making two rows of four slices. Leave a small space in between each slice of bread. When you’ve placed the last piece of bread on the sheet, flip each slice of bread over, starting with the first piece of bread that you placed on the sheet. Once all of the bread has been flipped, let the slices sit on the sheet until the bread soaks up the rest of the egg mixture (about 1 minute or so).

Place the sheet on the lowest rack in the oven and bake until the bottom of the slices are golden brown, about 10-15 minutes. (This takes about 10 minutes in my oven.) Move the sheet to the rack closer to the broiler and broil until the tops of the slices are golden brown, about 1-4 minutes. Watch the toast during this time to make sure it doesn’t burn, and rotate the pan as necessary to ensure even browning.

Remove sheet from oven and use a metal spatula to lift the slices off of the pan. Serve immediately.

From Cooks Illustrated, March / April 2019

Printable version

Perfect Bread

Like I mentioned earlier, one of my goals for this year is to bake more bread. And thanks to Karen’s generosity, I’m all set to scratch sourdough off my baking bucket list. I started feeding Fester last week, and he’s been a happy part of our family ever since. I even felt some guilt when I moved him from his warm spot next to my KitchenAid mixer to the fridge. (Side note: All credit for the name “Fester” goes to Karen’s husband, Arron.) 

My one hang-up with the sourdough process is the “discard” step. After four days of gradual feeding, the instructions said to reduce the starter down to just 1/2 a cup, feed that portion and then discard the rest. And I have to discard starter whenever I feed Fester from here on out! This goes against my thrifty nature! Not to mention the fact that I’m lovingly feeding him on a regular basis (which is more than I can say about the plant in my office…). Why would I want to throw some of it out?

So I’ve been searching the internet for things to do with “discarded” starter. Thankfully, King Arthur Flour has some great ideas and recipes. After reading several recipes, I decided to start with this cinnamon raisin swirl bread. I had everything on hand for them (unlike these delicious-sounding English muffins).

It took a few hours to make the bread, but most of that was hands-off time while the dough rose. And making the dough couldn’t have been any easier. I literally dumped it into the mixer and let the dough hook do the work. I was a little concerned when that the dough was going to be too soft and sticky to work with, but I rolled it out on a greased pastry mat and didn’t really have a problem.

I’m just a week into this sourdough / bread baking adventure, but if my first experience is any indication, this is going to be a tasty ride.

cinnamonraisinsourdough

Cinnamon Raisin Swirl Sourdough Bread

Note: I’ve been loving measuring by weight instead of volume (fewer dishes! improved accuracy!) lately, so I’m giving this recipe in weights. The good people at King Arthur Flour also provide standard volume measurements, so feel free to click over there if you need things in cups. 🙂

For the dough:
4 ounces of sourdough starter, fed or unfed
12 3/4 ounces all-purpose flour
2 1/2 teaspoons yeast (KA calls for instant; I used the active dry that I always have on hand.) 
1 tablespoon sugar
1 1/4 teaspoons salt
1 large egg
2 1/2 ounces softened butter
5 3/8 ounces lukewarm water

For the filling: 
1 3/4 ounces sugar
1 1/2 teaspoons cinnamon
2 teaspoons all-purpose flour
1 large egg, beaten with 1 tablespoon water
2 5/8 ounces raisins

extra butter for finishing, optional

To make the dough, combine all of the dough ingredients in the bowl of a stand mixer fitted with a dough hook. Turn the mixer on to medium-low speed and mix until the dough comes together, then increase the speed to medium and knead until a soft, smooth dough forms.

Place the dough in a lightly greased large bowl (I used my 8-cup Pyrex bowl.) and cover with plastic wrap. Let the dough sit until it has doubled in size, about 1-1/2  to 2 hours.

While the dough rises, stir the sugar, cinnamon and flour together in a small bowl. Set aside.

Lightly grease your counter (or a pastry mat), and then turn the dough out onto the prepared work surface. Gently deflate the dough, and then roll / pat it into a rectangle that’s about 6″ x 20″.

Brush the surface of the dough with the egg wash, then spread the cinnamon-sugar mixture over the dough. Sprinkle the raisins evenly over the surface of the dough.

Working from one of the short ends of the dough, roll the dough into a log. Pinch the ends closed to seal the log, and make sure the long seam is pinched closed.

Transfer the dough log into a greased 9″ x 5″ loaf pan. Cover with plastic wrap and let the dough rise until it is about 1″ above the edge of the loaf pan.

While the dough is rising, preheat the oven to 350°. When the dough is done rising, bake the bread for 40-45 minutes, or until the interior of the loaf measures 190° on a digital thermometer and the top is golden brown. Tent the bread with aluminum foil after the first 20 minutes to prevent the top from becoming too brown.

Remove the bread from the oven and run a knife along the edges of the pan to loosen the bread. Turn the bread out of the pan and brush the top with extra butter, if desired. (This gives the bread a soft, satiny crust.) Allow bread to cool before slicing.

From King Arthur Flour

Click here for a printable version.

Real Bread

Get this: I finally made real bread. I mean, I’ve baked bread before (both quick breads and sandwich breads), but they were nothing like this. I’m talking about bread with a perfect chewy crust and an interior that’s both studded with bacon AND filled with those fun little holes you find in fancy bakery bread. This stuff may have been the highlight of my weekend last week. (And that’s saying something, considering that I was going to tell you about the chocolate-Irish cream cookies that were in our cookie jar…) 

I’ve been tempted by the idea of a no-knead bread for a while now (ever since I started following King Arthur Flour on Facebook), and when the link to this recipe popped up in my feed, I knew that there was no going back. Never mind that I’d have to make a trip to the store to buy bread flour. This was happening. I did a little reading (again, thanks to KAF) about no-knead bread and decided that this was what weekends were made for.

I mixed up the flour, salt, water and yeast on Saturday afternoon, and since I didn’t feel like baking bread at 3 in the morning (reason #5,872 why I don’t work at a bakery), I let it sit until late Sunday afternoon. It was incredibly easy to put together too – mix, cover, rest and bake. The original recipe called for 8 ounces of bacon, and while I’m sure that would have been amazing, I had to work with what was in my fridge.

I was surprised by how little the bread appeared to rise overnight in the refrigerator, which made me a little concerned when I went to bake it Sunday. Thankfully, after 90 minutes of “resting,” and 45 minutes in a screaming hot oven, I was rewarded with the prettiest loaf of bread to come out of my oven. Seriously. It was round and crusty and perfect. We cheated on the cooling time and cut into it after it had been out of the oven for 30 minutes, rather than an entire hour.

Mmm. At the risk of sounding redundant, it was SO good. I’m sure it’d be a great foundation for a grilled cheese, or the perfect partner to a bowl of soup, but it didn’t last long enough for that around here. Maybe next time. Because there WILL be a next time. 🙂

No-Knead Bacon Bread

No-Knead Bacon Bread 

3 cups bread flour, plus extra for the mat
1/2 teaspoon active dry yeast
2 teaspoons kosher salt
1 cup and 6 tablespoons warm water
2 tablespoons minced fresh chives
4 slices of bacon, cooked until crisp
freshly ground black pepper
olive oil, for the mat

In a large bowl, mix together the flour, yeast, salt and water. Stir until the mixture is combined. Cover the bowl with plastic wrap and place it in the refrigerator for at least 12 hours. (I let mine rest for about 26 hours.)  

When you’re ready to bake the bread, remove it from the refrigerator and sprinkle the bacon and chives on the dough. Add a few generous grinds of black pepper, and then stir until the mix-ins are incorporated.

Next, spread a clean cotton kitchen towel on the counter and place a pastry mat or sheet of parchment paper on top of the towel. Lightly brush the mat with a thin layer of olive oil, and then spread a generous layer of flour (I used about a scant 1/3 cup.) on top of the oiled surface. Scrape the dough from the bowl and shape into a round loaf on the prepared surface. Generously dust the top of the loaf with another coating of flour. Lightly oil another piece of parchment paper and place it, oiled side down, on top of the bread dough. Cover the parchment paper with another cotton kitchen towel. Let the dough rest for 90 minutes.

During the last 30 minutes of resting, preheat your oven to 450 degrees. While the oven is preheating, place an oven-safe Dutch oven (love my Lodge!) in the oven to heat as well. When the 90 minutes is up, remove the Dutch oven from the oven and take the lid off of the pot. Remove the parchment paper and towel from the top of the loaf and carefully flip the dough into the preheated Dutch oven. Place the lid on the Dutch oven and return it to the oven. Bake for 30 minutes. Remove the lid from the Dutch oven and bake for another 15-20 minutes, or until the top is golden brown. Remove the pan from the oven. After a few minutes, use a pair of tongs to pick up the bread and place it on a wire rack to cool. Allow the bread to cool for at least 30 minutes before slicing and serving.

From My Name is Yeh

Click here for a printable version.

Cooking Club Win!

The theme for our most recent “cooking club” evening was appetizers, which meant that I had lots of possible recipes to chose from. There’s the avocado feta hummus. Or the avocado lemon feta dip. Or the sweet potato discs with pecans and cranberries (and since I’m not crazy about goat cheese, I’d swap it out for, you guessed it, feta). And those are just the recent additions to the list.

Thanks to some crazy schedules (and some last-minute planning), I knew I didn’t have time to fit in a stop to buy avocado, feta, or sweet potatoes. So I decided that bread could be an appetizer. I mean, you eat it while you wait for your meal to come at a fancy restaurant, right? (OK, so maybe that’s fancy bread that you dip in balsamic and olive oil, but just go with me on this, mmmk?)

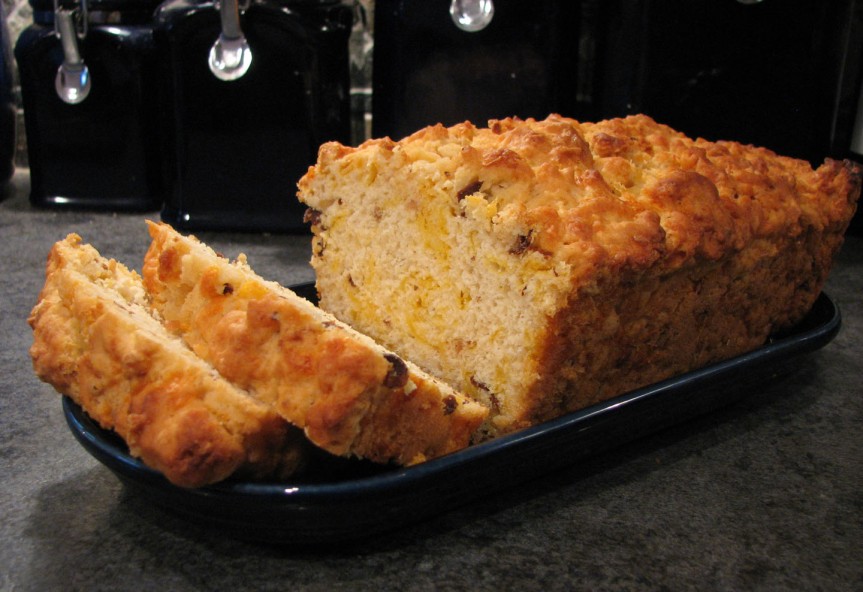
What we have here is a cheesy, bacony loaf of deliciousness. It smelled fantastic while it was baking, and it tasted good too. (It had cheese and bacon. How could it not??) Its’a quick bread, which meant no monkeying around yeast and letting the dough rise. It was good on its own, and it wasn’t bad with apple butter either.

I have to admit, the directions for this one weirded me out just a bit. Pour the melted butter in the bottom of the loaf pan? Add the dough and pour the bacon grease on top? I was convinced that I was going to end up with a greasy, soggy mess. But amazing things must have happened inside my oven, because the finished product wasn’t greasy OR soggy.

Amazing things indeed. After all, we’re talking about bacon, cheese and beer. In bread. The finished product didn’t last long at all.
Bacon Beer Cheese BreadBacon Beer Cheese Bread

6-7 slices of bacon, cooked until crisp and crumbled, drippings reserved (The original recipe called for 6 thick slices, but my bacon was on the thin side, so I went with 7.) 
3 cups of all-purpose flour
1/4 cup sugar
1 tablespoon baking powder
1/2 teaspoon salt
4 ounces shredded cheddar cheese
1 12-ounce bottle of beer
4 tablespoons unsalted butter, melted
2 tablespoons reserved bacon grease

Preheat oven to 350. Butter a 9″ x 5″ loaf pan.

Stir the flour, sugar, baking powder and salt together in a large mixing bowl. Add the cheese and crumbled bacon and stir to combine. When the cheese and bacon are evenly mixed into the flour, pour the beer into the bowl. Stir the mixture with a large spoon until it comes together.

Spoon/pour the batter into the prepared loaf pan. Spread it evenly in the pan and drizzle the melted butter and bacon grease over the top of the loaf.

Bake until a knife inserted into the center of the loaf comes out clean, about 50-60 minutes. Remove the pan from the oven and allow it to cool on a wire rack. After 10-15 minutes, you can flip the loaf out of the pan.

Slice and serve. Cover leftovers (what?) with plastic wrap and store at room temperature.

From Brown Eyed Baker, who adapted it from the Novice Chef

Click here for a printable version.


Cooking Club Dish, Round One

I’ve said it before, and I’ll say it again, I have excellent friends. I mean, without them, there wouldn’t be trips to the Wilton tent sale, taco nights, puppy chow parties, or wine coolers. OK, maybe those things would still exist, but I wouldn’t want to experience them by myself. The world would be a much sadder place.

Here’s the latest idea, courtesy of my friend Emily: Cooking Club Nights!

Once a month, several of us girls are getting together for an evening of food and fun. The host provides the main dish and sets the theme, and everyone else brings side dishes, appetizers, desserts, drinks, etc. It gives us a chance to catch up on each other’s lives and try recipes that our husbands aren’t always interested in eating. Which is why I made bruschetta.

This wasn’t a new recipe, but it is one that I hardly ever make, simply because I’d be the only one eating it. (Wait… is this a bad thing?) It’s easy, and it uses lots of tomatoes (always a bonus). Plus, who doesn’t love toasted, garlicky bread? No one I hang out with, anyway. 😀

Bruschetta

Tomato Bruschetta

1 loaf of French bread, sliced into 1″ thick pieces
3 garlic cloves, two sliced in half and one minced
1/4 cup grated Parmesan cheese
2 cups diced tomatoes (The original recipe calls for Romas; I used a mix of Roma and cherry tomatoes.) 
3-5 tablespoons extra-virgin olive oil (I broke out the good stuff for this recipe – Andy’s brother went to Italy and brought us back a bottle of olive oil!) 
1/3 cup thinly sliced basil leaves, plus more for garnish, if desired
2 tablespoons balsamic vinegar
salt and freshly ground black pepper

Preheat the oven to 350 degrees.

Place the sliced bread in a single layer on a cookie sheet and bake until just golden. Flip the slices over and toast the other side. Remove from oven and rub both sides of each piece of bread with the halved garlic cloves. Lightly drizzle with olive oil, and then sprinkle with grated cheese. Return the bread to the oven and cook just until the cheese has melted.

In a medium bowl, toss the tomatoes with the minced garlic, basil, vinegar and 2 tablespoons of olive oil. Season to taste with salt and pepper. Allow tomato mixture to sit for five to 10 minutes for the flavors to meld before serving.

Top bread with tomato mixture and enjoy!

From the Food Network

Click here for a printable version.

Cornbread, Non-Jiffy Style

I remember being slightly disappointed the first time I tried cornbread as a kid. It wasn’t a terrible experience by any means, but it wasn’t outstanding. I seem to remember it being dry and relatively flavorless. As a result, I never went out of my way to find cornbread. If it was served with chili at someone’s house, I might take a piece, but I’d be just as likely to save the calories for dessert (or extra cheese and sour cream in my chili). 🙂

Well, for some unknown reason, I decided that I wanted to make cornbread to go with a batch of chili earlier this year. Where that urge came from, I have no idea. (Perhaps this is what happens when I peruse starred items in my Google reader…) Since almost everything is better with onions and cheese, I figured Branny’s recipe was a good place to start. I detoured through the grocery store on my way home (hello impulse cooking!), snagged some scallions and got cooking.

And… success! This came together quickly and smelled great when it was in the oven. I liked it so much that I took the leftovers to work even after I ran out of leftover chili to go with the cornbread.

CheddarScallionCornbread

Cheddar Scallion Cornbread

1 1/4 cup cornmeal (I used fine ground, since that’s what I have on hand.) 
3/4 cup all-purpose flour
1 tablespoon sugar
2 teaspoons baking powder
3/4 teaspoon salt
1/2 teaspoon baking soda
4 ounces extra-sharp cheddar cheese, grated
3 scallions, thinly sliced (white and green parts)
1 cup sour cream (I used reduced-fat sour cream with no problems.) 
1/3 cup water
2 large eggs
3 tablespoons unsalted butter, melted

Preheat the oven to 425. Grease a 9″ round pan; set pan aside. (I used a cake pan the first time. Since then, I received a cast-iron skillet, and I’ve used that for cornbread. I think I just like the look of serving from the cast iron pan instead.) 

In a large mixing bowl, whisk the cornmeal, flour, sugar, baking powder, salt and baking soda together. Fold the cheese and scallions into the dry ingredients.

In a separate bowl, stir together the sour cream, water, butter and eggs. Pour the wet ingredients into the dry ingredients and gently mix until just combined.

Spread the batter in the prepared pan, and bake until the top is golden brown and the cornbread tests done with a toothpick (roughly 20 minutes). Remove from oven and let cool about 5 minutes before serving. Cut into wedges and serve with your favorite chili.

From Branny Boils Over

Click HERE for a printable version!