Potato and Cheese Tart

229 days. That’s how long it’s been since I’ve sat down and tried to write anything here. Is it laziness? Writer’s block? A lack of interest? I suppose it could be all of the above. Hmm. 

Anyway… I was scrolling through my food pictures from 2019 when I stumbled on the pictures of this blue cheese potato tart, and I thought, “if there’s a recipe worth putting on the blog, it’s this one.”

I mean, this one ticks all of my food boxes: bread / pastry, potatoes, and cheese. If I could live on this combination AND still fit into my pants, I’d eat it 3-4 days a week. (My choice for the rest of the week? Tacos.) 

I’d originally planned to make the Parmesan / potato tart from the same issue of Cook’s Country, but I was running low on parm, so I went with the blue cheese version instead. I have zero regrets about that choice.

The tart takes a little while to bake, but that means you can have the dishes done (and a salad made, if you’re interested in balanced meals) by the time it comes out of the oven. It will smell incredible, and, if you’re anything like us, you’ll cheat the 20 minute cooling time by at least 10 minutes.

potatobluecheesetart

Blue Cheese and Potato Tart

For the tart dough: 
7-1/2 ounces all-purpose flour
1/2 teaspoon table salt
10 tablespoons unsalted butter, cut into 1/2″ pieces and chilled
6-7 tablespoons ice water

For the filling: 
4 ounces cream cheese
2 ounces blue cheese, crumbled, divided
1 ounce Parmesan cheese, grated, divided
2 tablespoons extra-virgin olive oil
2 teaspoons Dijon mustard
1-1/2 teaspoons minced fresh rosemary, divided (I was out of fresh and subbed dried with no issues.) 
1/4  teaspoon pepper
1/2 teaspoon salt
1 large egg, separated
1 pound russet potatoes, peeled and sliced 1/8″ thick
1 shallot, thinly sliced

First, prepare the tart dough. Process the flour and and salt in the bowl of a food processor until combined, just a few seconds. Scatter the butter on the flour mixture and pulse until the mixture resembles coarse crumbs, about 10 pulses or so. Add 6 tablespoons of ice water and process until almost no dry flour remains, about 10 seconds. Scrape down the sides of the bowl. Add the remaining tablespoon of water if the dough won’t come together.

Scrape the dough out onto a lightly floured counter and shape it into a 4″ square. Wrap the dough in plastic wrap and chill it in the fridge for an hour. (If you’re a planner, this step can be done ahead of time – the dough can hang out in the fridge for up to 2 days.) 

When you’re ready to make the tart, remove the dough from the fridge and preheat the oven to 375°. Line a baking sheet with parchment paper (or a silicone baking sheet). Let the chilled dough soften on the counter for about 10 minutes, then roll the dough into a 14″ x 11″ rectangle on a lightly floured counter. Transfer the dough rectangle to the prepared baking sheet.

In a large bowl, microwave the cream cheese until it’s softened, about 20 to 30 seconds. Whisk in 1/4 cup of blue cheese, 1/4 cup Parmesan cheese, olive oil, mustard, 1 teaspoon rosemary, pepper, and salt. Add the egg yolk and whisk until combined. Add the potatoes and shallot to the cheese mixture and stir until the potatoes are thoroughly covered.

Pile the filling in the center of the dough. Spread it an even layer, leaving a 2″ border on all sides. Sprinkle the rest of the blue cheese, 2 tablespoons of Parmesan cheese, and the rest of the rosemary over the filling.

Fold one long side of the dough about 1-1/2″ over the filling. Do the same thing on the other long side of the tart. Fold in the short sides of the dough and overlap the corners to secure the dough. Lightly beat the egg white and brush it all over the folded crust. Sprinkle the rest of the Parmesan cheese all over the crust.

Bake until the crust and filling are golden brown and the potatoes test done when poked with a fork, about 45 minutes. Transfer the baking sheet to a wire rack, and let the tart cool for about 10 minutes. Use a metal spatula to loosen the tart from the parchment paper and slide it onto the wire rack. Let tart cool until warm, then slice and serve.

from Cook’s Country, December / January 2020 

Looking for a printable version?

Toast: Not Just for Breakfast

I first tried this recipe in an attempt to use up some ricotta cheese before it went south. I had all of the ingredients on hand, and it seemed better than letting the cheese mold in the back of the fridge. I didn’t know how Andy would feel about them, but I went ahead and served them for dinner anyway. (Yep, my kitchen is a dictatorship. I like to think of it as a benevolent dictatorship though…) Turns out, we both loved them.

I can’t decide what takes these things over the top. Maybe it’s the caramelized onions. Or the cheese. Or the bread. Maybe it’s everything put together. Either way, this is our new favorite appetizer. I may never make soup again. (Just kidding, Andy. Mostly.) 

I like to tell myself that, as far as appetizers go, this one is relatively healthy. Yes, there’s cheese and bread, but it’s buried underneath a hearty serving of squash and onions. Which meant that cramming several of these in my face on New Year’s Eve was perfectly acceptable.

It’s best on fresh, homemade bread, but it’s not bad on crusty Italian bread from the grocery store bakery. I’ve garnished it with mint (per the recipe) and with parsley (after my mint was done for the year), and we’ve liked it with both. And, as you can see from the picture, it’s just as good if you forget to buy something green.

I’m not sure how Deb figures that four slices of bread is enough for all of the squash. Maybe her bread is bigger than mine, or she heaps the squash more heavily. I’ve also given up measuring the ricotta for the toasts. Instead, I just take a spoon and smear a generous scoop of cheese on the warm toast before piling the delicious squash-onion mixture on top. (Of course, this means my “instructions” will be more like guidelines. Oh well.)

squashtoasts

Squash Toasts with Caramelized Onions and Ricotta Cheese

olive oil
1 loaf of Italian bread
1 2-1/2 to 3 lb. butternut squash
pinch red pepper flakes
coarse salt
1 large yellow onion, thinly sliced
1/3 cup apple cider vinegar
1/4 cup maple syrup
1/2 – 1 cup ricotta cheese
finely chopped parsley or mint, for garnish

Preheat oven to 450° and line a rimmed baking sheet with parchment paper. Cut the squash in half lengthwise and the cut each half into slices that are about 1″ thick. Toss the squash with a couple tablespoons of olive oil and then sprinkle with a generous pinch of salt and the red pepper flakes. Spread the squash in a single layer on the baking sheet and roast until tender (usually 25-40 minutes, depending on how thick your squash slices were). Remove from the oven and let the squash cool until you can handle it (about 20 minutes).

Scrape the squash from its skin and put the roasted squash into a large mixing bowl. Discard the skin.

Meanwhile, heat a large, heavy-bottomed skillet over medium-high heat. (I use my 12″ Lodge.) Add three tablespoons of olive oil to the pan and then add the onion slices. Sprinkle with 1 teaspoon of salt and cook, stirring often, until the onions begin to soften and turn brown. Reduce the heat and let the onions cook until they are golden brown and delicious. Add the vinegar and maple syrup to the pan and cook, stirring often, until the mixture is jam-like.

Remove the onions from the heat and add them to cooked squash. Use a fork to mix the squash and onions together. Taste the mixture and adjust the seasonings if necessary.

Slice the bread into 1″ thick pieces. Heat a large skillet (again, I use the cast iron skillet) over medium-high heat and add 1 tablespoon of olive oil to the pan. Toast the slices of bread in the skillet until they are golden brown on each side. Depending on how many slices of bread you have, you may need to add more olive oil to the pan. Place the bread on paper towels to drain while you finish cooking the bread.

Spread a generous spoonful of ricotta cheese on each piece of bread, and then top with a scoop of the onion-squash mixture. Garnish with the chopped mint or parsley. Serve warm or at room temperature. Store leftovers (if you’re lucky enough to have them) in the refrigerator.

Barely adapted from Smitten Kitchen, who adapted it from Jean-Georges Vongerichten’s ABC Kitchen, via NYTimes Cooking

Click here for a printable version.

The Perfect Summer Side

Ah, summer. The season of picnics and cookouts, graduation parties and camping trips. You know what all of those things have in common? Food! Whatever’s happening, people need to eat, right? And most of the time, there will be pasta salad on the table. Sometimes it’s good. Sometimes it’s drowning in mayo and isn’t so good. Sometimes, much to Andy’s dismay, it’s the only side dish at the party.

Unless, of course, this pasta salad is available. It’s so good that Andy (who says pasta salad makes him gag), eats more than just a polite serving. He goes back for seconds and thirds. And then he raids the fridge for the leftovers.

The first time I tried it, I was amazed  that something so simple could be so delicious. It’s just orzo, lemon juice, olive oil, fresh basil, feta and dried cherries, with some greens thrown in for good measure. My friend Bethany made it for a get-together, and wow. It was summer loving at first bite for me. Clearly, this was something special.

Like any good summer salad, this one is easy to throw together. It tastes good straight out of the fridge or at room temperature. I can’t decide if it’s the basil, the cherries or the feta that puts this one over the top. Maybe it’s all three together, in a trifecta of awesomeness.

I didn’t have arugula on hand, but I’d gotten a bunch of Swiss chard in our CSA the week beforehand, so I figured that would work out OK. I ended up sauteing the stems and then the chopped leaves, since I think they’re a little tough and chewy raw. It didn’t take that much longer, and it gave me something to do while I waited for the pasta to cool. Good thing too. Otherwise I might have eaten all of the feta before it made its way into the salad. 😉

I almost skipped the pine nuts because they were ridiculously expensive in my grocery store but decided to splurge when I found a slightly cheaper package of them. I used some of my awesome Italian olive oil from Andy’s brother, Dan, and I think it really made a difference in the end result. So if you have the good stuff, this is the time to break it out. And then you may want to keep it out, since you’ll probably need to make a second batch to take to a picnic or something.

OrzoPastaSalad

Tri-Color Pasta Salad

1 lb. uncooked orzo pasta
3 tablespoons plus up to 1/4 cup of olive oil, divided
2 cups chopped greens (arugula, spinach or Swiss chard)
3/4 cup crumbled feta cheese
1/2 cup dried cherries
12 fresh basil leaves, torn
3 tablespoons fresh lemon juice
1/4 cup toasted pine nuts
1 1/2 teaspoon salt (I didn’t measure this.) 
1 teaspoon pepper  (Again, I didn’t measure.)

Bring a large pot of salted water to a boil. Cook the pasta according to the package directions, then drain the pasta and quickly rinse it with cool water.

Spread the cooked pasta in an even layer on a large rimmed baking sheet and drizzle with three tablespoons of olive oil. Set aside to cool.

While the pasta cools, prepare the rest of the salad.

If you’re using Swiss chard, separate the stems from the leaves and chop the stems into 1/4″ pieces. Add some olive oil to a large skillet and saute the stems until they are crisp tender. Chop the leaves into bite-sized / manageable pieces and then add them to the skillet when the stems are almost done. Take the pan off the heat.

If you’re using spinach or arugula, simply wash the leaves and tear them into bite-sized pieces.

Place the greens in a large bowl and then add the pine nuts, cherries, basil and feta cheese. Scrape the orzo into the bowl and add the lemon juice. Gently mixed until everything is well-distributed. Drizzle with the remaining olive oil (up to 1/4 cup) until the pasta is well-coated and doesn’t appear dry. Mix everything one more time, then season with salt and pepper to taste.

Serve cold or at room temperature. Hide store leftovers in an airtight container in the refrigerator.

From my friend Bethany

Click here for a printable version.

Cheese Pie? Yes Please.

Andy is pretty easy-going about 99% of things in life, so when he does have an opinion, I try to pay attention. It usually works out well too. That’s how we ended up with one of our favorite chicken dishes and our go-to Meatless Monday meal. So when he commented on a delicious-looking “impossible” ham and cheese pie from Cook’s Country, I figured I’d should probably check it out. I saved the recipe before it became “subscriber only,” but that’s as far as it went. For months.

It’s not that I meant to ignore it, but other things kept popping up (such as EVERYTHING in this book). Plus, I wasn’t sure how I’d feel about that much Gruyère. Swiss isn’t my favorite cheese, so I tend to be apprehensive about Gruyère. But I kept remembering how excited he seemed about it, and really, could something full of cheese and ham be bad? And the whole “impossible” pie concept intrigued me. Instead of lining the plate with a standard crust (which never goes well for me), you coat it with Parmesan cheese and wait for some scientific magic to create a crust while the pie bakes.Fun, right?

Of course, I took so long to  make it that Andy had completely forgotten about it by the time I served it for dinner. Whoops.

I’m glad I did make it though, because oh my goodness, it was so good. Looking back, that probably shouldn’t surprise me, since it’s basically a pie full of cheese, but seriously. We could not stop raving about it. Or eating it. Andy declared it a five after one bite. I wanted to keep the leftovers all to myself. In fact, giving Andy the last piece for lunch may be the most selfless thing I’ve done in our entire marriage. Kidding. Mostly. 😉

I used a smoked Gruyère, since that sounded better to me than regular Gruyère, but that was the only change I made. It was really good with the ham, but I don’t think you could go wrong with bacon either. It took a little time in the oven, but it was easy to put together, so this is definitely going on the favorites list. And next time, I won’t wait almost a year to try something.

ImpossibleHam&CheesePie
Notice the giant salad in the background? That’s my attempt at balance. A giant plate of greens means I can eat cheese for dinner, right?

Impossible Ham & Cheese Pie 

2 tablespoons unsalted butter, melted, plus another tablespoon softened for the pan
3 tablespoons finely shredded Parmesan cheese
2 cups shredded smoked Gruyère cheese
4 ounces of ham, cubed
4 scallions, chopped
1/2 cup (2 1/2 ounces) all-purpose flour
3/4 teaspoon baking powder
1/2 teaspoon pepper
1/4 teaspoon salt
1 cup half-and-half
4 large eggs, lightly beaten
2 teaspoons Dijon mustard
1/8 teaspoon ground nutmeg

Place the oven rack in its lowest position, and preheat the oven to 350°.

Butter a 9″ pie plate with the tablespoon of softened butter. Evenly coat the pie pan with the grated Parmesan cheese.

Combine the shredded Gruyère, ham and scallions in a large mixing bowl. Mix together and then evenly spread in the prepared pie pan.

Mix the flour, baking powder, salt and pepper together in the now-empty mixing bowl. Whisk the eggs, half-and-half, melted butter, mustard and nutmeg into the flour mixture. When the batter is smooth, pour it over the cheese-ham-scallion mixture in the pie pan.

Bake until the pie is lightly golden brown and the filling is set, about 30-35 minutes. Remove from oven and let cool on a wire rack for 15 minutes. Slice into wedges and serve warm.

From Cook’s Country

Click here for a printable version.

Garlic + Parm + Potatoes

Mashed potatoes. Come on, who needs a recipe for mashed potatoes? You cook the spuds, add some butter and milk (and sour cream and cheese, if you’re feeling indulgent), and season with salt and pepper. What’s to know?

A lot, according to my latest copy of Cook’s Illustrated. I was reading the article about a French apple tart (looks beautiful, but I think it will take all day just to slice the apples for it!) when I noticed the recipe on the preceding page: Parmesan Garlic Mashed Potatoes. The potato recipe looked significantly less involved than the tart recipe, plus, I had everything to make it. On the menu it went!

It goes without saying that since it’s a Cook’s Illustrated recipe, it’s more involved than your standard potato recipe. I did question some things in the recipe (such as why I have to cut the butter into chunks when I’m melting it anyway…), but since CI has tested for practically every scenario, I stuck to the recipe. For the most part, anyway. I saw no reason to pour the melted butter, garlic and Parmesan cheese from the saucepan into a separate bowl before then pouring it into the potatoes. They may have a dedicated dish crew, but I am not that lucky. 🙂 (I do appreciate all of the testing and science behind their recipes though. I definitely learn something from each issue – even if I don’t get around to making all of the recipes.) 

Extra steps or not, it was worth it. The recipe says it feeds 4-6 people as a side dish, but I could have skipped the rest of dinner and just had potatoes. I hoarded the leftovers. (Sorry to all of my coworkers for making the office smell like garlic!) I licked the spatula and the potato masher clean. (OK, so I do that anytime I make mashed potatoes… let’s not get hung up on the details…) If I were making the potatoes for Thanksgiving, these would definitely be on my short list. But since I’m not in charge of the spuds (to my knowledge, anyway), I’ll just make these for other special occasions. You know, like Tuesday dinners. 😀

Garlic Parm Mashed Potatoes

Parmesan Garlic Mashed Potatoes

2 pounds potatoes, peeled and sliced into 1/2″ thick chunks (CI recommends Yukon Golds; I just used the white potatoes from my Grandma.)
4 tablespoons unsalted butter, cut into 4 pieces
1/2 teaspoon garlic powder, mixed with 1/2 teaspoon water
1 1/4 teaspoons garlic, zested/minced into a paste, divided
2/3 cup warm milk
1 1/2 ounces (3/4 cup) freshly grated Parmesan cheese
salt and pepper
parsley, for garnish (optional)

Place the potatoes in a large saucepan and add water until potatoes are covered with 1″ of water. Bring to a boil over medium heat, then reduce to a simmer and cook until potatoes are tender (about 15 minutes) and pierce easily with a paring knife. Remove from heat and drain the potatoes.

Meanwhile, melt the butter in a small saucepan over medium-low heat. Add the garlic powder/water mixture and 1 teaspoon of minced garlic to the butter and cook, stirring constantly, until the garlic is fragrant, about 1 minute. Remove the pan from the heat. Stir in Parmesan cheese, the remaining 1/4 teaspoon of garlic and 1/2 teaspoon freshly ground pepper.

Place the potato saucepan back on the stove over low heat. Add the potatoes to the pot and mash them. (Cook’s Illustrated recommends using a potato rice, but since I don’t own one, I just used my hand masher.) Stir the butter-Parmesan mixture into the mashed potatoes. Pour the milk into the potatoes and stir until combined. Taste the potatoes and season with salt, if necessary. (I added a scant 1/2 teaspoon to the mixture… significantly less than the 1 1/4 teaspoons that CI recommended.) Transfer the potatoes to a serving dish and top with parsley, if using. Serve immediately. (Unless the rest of your dinner isn’t ready yet. If that’s the case, simply cover the potatoes with foil and place in a warm oven.) 

From Cook’s Illustrated, December 2014

Click here for a printable version.

Cooking Club Win!

The theme for our most recent “cooking club” evening was appetizers, which meant that I had lots of possible recipes to chose from. There’s the avocado feta hummus. Or the avocado lemon feta dip. Or the sweet potato discs with pecans and cranberries (and since I’m not crazy about goat cheese, I’d swap it out for, you guessed it, feta). And those are just the recent additions to the list.

Thanks to some crazy schedules (and some last-minute planning), I knew I didn’t have time to fit in a stop to buy avocado, feta, or sweet potatoes. So I decided that bread could be an appetizer. I mean, you eat it while you wait for your meal to come at a fancy restaurant, right? (OK, so maybe that’s fancy bread that you dip in balsamic and olive oil, but just go with me on this, mmmk?)

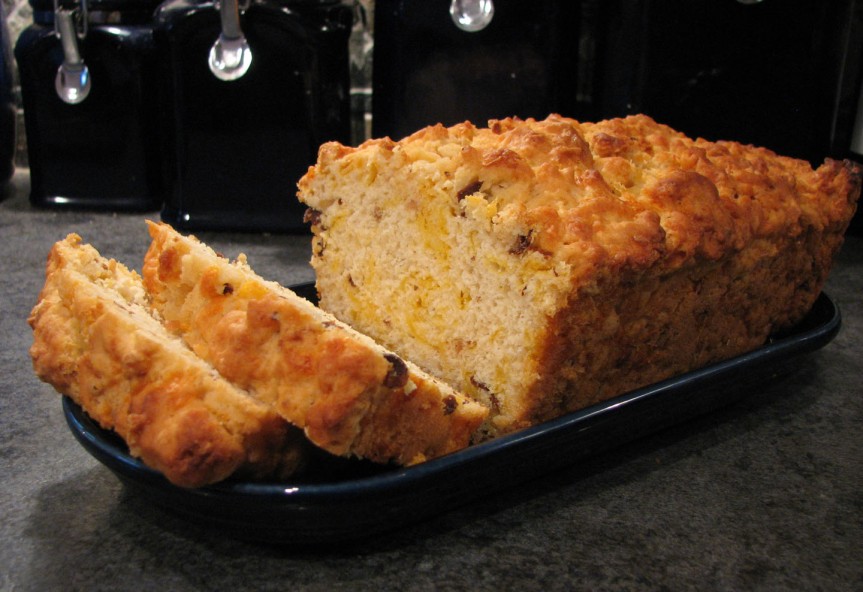
What we have here is a cheesy, bacony loaf of deliciousness. It smelled fantastic while it was baking, and it tasted good too. (It had cheese and bacon. How could it not??) Its’a quick bread, which meant no monkeying around yeast and letting the dough rise. It was good on its own, and it wasn’t bad with apple butter either.

I have to admit, the directions for this one weirded me out just a bit. Pour the melted butter in the bottom of the loaf pan? Add the dough and pour the bacon grease on top? I was convinced that I was going to end up with a greasy, soggy mess. But amazing things must have happened inside my oven, because the finished product wasn’t greasy OR soggy.

Amazing things indeed. After all, we’re talking about bacon, cheese and beer. In bread. The finished product didn’t last long at all.
Bacon Beer Cheese BreadBacon Beer Cheese Bread

6-7 slices of bacon, cooked until crisp and crumbled, drippings reserved (The original recipe called for 6 thick slices, but my bacon was on the thin side, so I went with 7.) 
3 cups of all-purpose flour
1/4 cup sugar
1 tablespoon baking powder
1/2 teaspoon salt
4 ounces shredded cheddar cheese
1 12-ounce bottle of beer
4 tablespoons unsalted butter, melted
2 tablespoons reserved bacon grease

Preheat oven to 350. Butter a 9″ x 5″ loaf pan.

Stir the flour, sugar, baking powder and salt together in a large mixing bowl. Add the cheese and crumbled bacon and stir to combine. When the cheese and bacon are evenly mixed into the flour, pour the beer into the bowl. Stir the mixture with a large spoon until it comes together.

Spoon/pour the batter into the prepared loaf pan. Spread it evenly in the pan and drizzle the melted butter and bacon grease over the top of the loaf.

Bake until a knife inserted into the center of the loaf comes out clean, about 50-60 minutes. Remove the pan from the oven and allow it to cool on a wire rack. After 10-15 minutes, you can flip the loaf out of the pan.

Slice and serve. Cover leftovers (what?) with plastic wrap and store at room temperature.

From Brown Eyed Baker, who adapted it from the Novice Chef

Click here for a printable version.


Brussels. Bacon. Cheese.

I don’t remember eating Brussels sprouts as a kid. Maybe my mom didn’t make them, or perhaps I’ve just repressed that memory. 😀 So, when we received a stalk of Brussels sprouts in our CSA last fall, I was at a loss for how to prepare them. My M.O. for “strange” or “possibly unlikable” vegetables is to roast them. I’m pretty sure you could toss just about anything with olive oil, garlic, salt and pepper, roast it for 20 minutes and have it taste good. Especially if you hit the final product with some lemon juice and Parmesan cheese before you dig in.

That’s what I did with those first sprouts. Then I saw this recipe for roasted Brussels sprouts with blue cheese. Roasted sprouts with melty, creamy, tangy cheese? Sign me up. But then, I started thinking about how much better those sprouts would be with some bacon. Smoky, salty bacon. (Bacon is Andy’s suggestion for nearly every savory dish. “It’s good, but it’d be better with bacon.”)

And better it was. The outer leaves of the sprouts crisped in the oven, and the cheese melted into delicious strings puddles pockets studded with bacon crumbles. Most of the sprouts didn’t even make it to our plates – we gobbled them straight from the serving dish. I’d even go so far as to say it’s the best side dish I’ve made in a long time. In fact, it gets 10 stars on our dinner scale – a scale that only goes up to 5.

BaconBlueCheeseSprouts

Bacon Blue Cheese Brussels Sprouts

3 strips of bacon, cooked until crisp and crumbled
1/2 lb. Brussels sprouts
1 tablespoon olive oil, plus extra for the pan
salt and freshly ground black pepper
1 ounce blue cheese crumbles

Preheat oven to 400 degrees. Brush a rimmed baking sheet with olive oil.

Wash the Brussels sprouts and trim the stems off the base of the sprouts. Halve the Brussels sprouts and place in a large mixing bowl. Drizzle olive oil over sprouts and toss with with oil, salt and pepper. Spread Brussels sprouts on the baking sheet.

Roast until sprouts are golden brown and centers are tender, about 20 minutes. Remove tray from oven and sprinkle with blue cheese and bacon crumbles. Stir the sprouts with a spatula to evenly distribute the cheese and bacon among the sprouts. Return the tray to the oven and bake for an additional 2-3 minutes, or until cheese is fully melted.

Serve immediately.

Adapted from An Apple a Day, originally from Nicole Morrissey’s “Prevention RD’s Everyday Healthy Cooking”

Click here for a printable version.


The Power of Feta (and Bacon)

This was one of those meals that I wasn’t too excited about at first. I’m usually not a big egg eater – I prefer to eat my eggs in ice cream, cake and cookies. I made it for two reasons: Andy loves breakfast for dinner, especially eggs, and I really enjoy feta cheese. Plus, it did come from my new favorite cookbook. I guess that’s three reasons.

The first time I made it, it took a LOT longer than I had anticipated. (Operator error here. It helps if you read the ENTIRE recipe before jumping in. Especially when you start cooking at 8 pm. Details.) Maybe it was the fact that we were eating at 9pm, maybe it was the feta talking. Either way, I was pleasantly surprised by how much I liked it. Even so, I figured that eggs wouldn’t reheat the greatest and sent most of the leftovers to work with Andy and took something else from the fridge. When I finally had some of the leftovers, I was (again) surprised by how much I liked them.

Lesson learned. You can’t go wrong with potatoes, feta and bacon.

I’ve also made this with ham, on a day when I was out of bacon. It’s good with ham, but let’s face it… everything is better with bacon. (Yes, everything. Even cheesecake.)

And now I have a new favorite breakfast for dinner dish. Because, let’s face it. Now that I know it needs nearly 40 minutes in the oven, I’m probably not getting up early enough to make this on a Saturday morning. 😀

Frittata

Potato, Scallion and Bacon Frittata with Feta

1 3/4 lbs. potatoes
1/4 lb. bacon, preferably thick-cut
olive oil, for the pan
3-4 scallions
3 ounces feta cheese, crumbled
6 eggs
2 tablespoons milk
salt and pepper

Preheat the oven to 400 degrees. Brush a tablespoon or two of olive oil on to a large baking sheet.

Peel the potatoes and slice them in half length-wise, then slice each half into semi-circles that are between 1/4″ and 1/2″ thick. (My slices are never even. Some are thinner than 1/4″; some are thicker. It all works out though.) Spread the potato slices on the prepared baking sheet and season with salt and pepper. Bake for 30 minutes, flipping them once at the halfway point. Remove from oven and set aside to cool slightly. Keep the oven on.

Line the baking sheet with foil, and place the bacon strips on the sheet. Bake for 10-20 minutes, or until bacon is crispy. Remove from oven and allow to cool. (Alternatively, you can cook the bacon on the stovetop, but I love the oven method because there’s less mess.) Drain one tablespoon of bacon drippings into a cast-iron (or other oven-safe) skillet and combine with a little (probably less than a tablespoon) olive oil. Heat the pan over medium heat and swirl the oil around the warm pan, being sure to coat the sides. Remove from heat once the oil coats the pan.

Meanwhile, thinly slice the scallions and crumble the bacon. Scatter the potatoes in the bottom of the skillet, then sprinkle the bacon and scallions on top of the potatoes. Sprinkle the feta cheese all over the top of the potato/bacon/scallion mixture.

In a medium bowl, whisk the eggs together with the milk, a pinch of salt and some black pepper. Pour the egg mixture into the skillet. Cover with foil and bake for 20 minutes. After 20 minutes, remove the foil and bake for another 10-15 minutes, or until the eggs are done and the top is nicely browned. Slice in wedges and serve immediately.

From the Smitten Kitchen Cookbook

Click here for a printable version

Cornbread, Non-Jiffy Style

I remember being slightly disappointed the first time I tried cornbread as a kid. It wasn’t a terrible experience by any means, but it wasn’t outstanding. I seem to remember it being dry and relatively flavorless. As a result, I never went out of my way to find cornbread. If it was served with chili at someone’s house, I might take a piece, but I’d be just as likely to save the calories for dessert (or extra cheese and sour cream in my chili). 🙂

Well, for some unknown reason, I decided that I wanted to make cornbread to go with a batch of chili earlier this year. Where that urge came from, I have no idea. (Perhaps this is what happens when I peruse starred items in my Google reader…) Since almost everything is better with onions and cheese, I figured Branny’s recipe was a good place to start. I detoured through the grocery store on my way home (hello impulse cooking!), snagged some scallions and got cooking.

And… success! This came together quickly and smelled great when it was in the oven. I liked it so much that I took the leftovers to work even after I ran out of leftover chili to go with the cornbread.

CheddarScallionCornbread

Cheddar Scallion Cornbread

1 1/4 cup cornmeal (I used fine ground, since that’s what I have on hand.) 
3/4 cup all-purpose flour
1 tablespoon sugar
2 teaspoons baking powder
3/4 teaspoon salt
1/2 teaspoon baking soda
4 ounces extra-sharp cheddar cheese, grated
3 scallions, thinly sliced (white and green parts)
1 cup sour cream (I used reduced-fat sour cream with no problems.) 
1/3 cup water
2 large eggs
3 tablespoons unsalted butter, melted

Preheat the oven to 425. Grease a 9″ round pan; set pan aside. (I used a cake pan the first time. Since then, I received a cast-iron skillet, and I’ve used that for cornbread. I think I just like the look of serving from the cast iron pan instead.) 

In a large mixing bowl, whisk the cornmeal, flour, sugar, baking powder, salt and baking soda together. Fold the cheese and scallions into the dry ingredients.

In a separate bowl, stir together the sour cream, water, butter and eggs. Pour the wet ingredients into the dry ingredients and gently mix until just combined.

Spread the batter in the prepared pan, and bake until the top is golden brown and the cornbread tests done with a toothpick (roughly 20 minutes). Remove from oven and let cool about 5 minutes before serving. Cut into wedges and serve with your favorite chili.

From Branny Boils Over

Click HERE for a printable version!

Cheese Snowflakes (a.k.a. Cheese Straws)

I’m not sure where this greatness has been all of my life. Being a Midwestern girl through and through, cheese straws weren’t something I’d ever encountered before. But a wonderful friend gave me a gift subscription to Southern Living, and these babies were featured in the recipe section of my first issue. A easy-to-prep, savory snack that I could add to my Christmas goodie boxes? I’m in. (After all, I’ll try anything once.)  

Gifts
One of my Christmas gift boxes: Smoked Almonds, Everyday Granola, Cheese Straws, and a bottle of my favorite local wine.

Then, I baked these suckers and discovered that they taste just like A HOMEMADE CHEEZ-IT. Seriously. And now that Christmas is over, you don’t have to add them to anyone’s gift box. You can keep the whole batch for yourself and not feel guilty about it. (Hey, New Year’s resolutions don’t kick in until Tuesday.) 

CheeseStraws

Cheese Straws

10 ounces sharp cheddar cheese, shredded
1/2 cup unsalted butter (one stick), softened
1 tablespoon half-and-half (I diluted some heavy cream)
1 teaspoon kosher salt (I went easy on this, since the cheese has salt in it.) 
1 1/2 cups flour
1 teaspoon smoked paprika
1/2 teaspoon cayenne pepper

Preheat oven to 350. Line cookie sheets with parchment paper.

In the bowl of a stand mixer, beat the cheese and butter together. Beat in the half-and-half and salt. Gradually add the flour and spices, mixing until just combined. Form the dough into a ball.

Turn the dough out on to a well-floured surface (I used my pastry mat) and divide the dough into two equal portions. Roll out the first portion until it is 1/8″ thick. Using cookie cutters (or a knife, if you’re not interested in fun shapes!), cut out shapes. Place cheese straws on prepared cookie sheets about one inch apart.

Bake until golden, about 15 minutes. (Mine were done in about 14 minutes.) Remove from oven and let cool on sheets on wire rack. When straws have cooled, remove them from the cookie sheets.

Repeat with second ball of dough. When finished, reroll all of the scraps and cut into shapes. (Southern Living suggested only rerolling the scraps once; I disregarded that advice and kept rolling and cutting until all of the dough was gone.) 

Store in an airtight container.

Note: I had the best luck with the snowflakes and the tiny airplanes. I also used my tiny biscuit cutter to make round ones, however, I found that those softened the quickest after being stored overnight. The snowflakes and airplanes kept their crunch. 

Barely adapted from Southern Living, December 2012