Birthday Beans

Andy loves baked beans. I’m talking a level of love that most people reserve for chocolate. Or coffee on Monday mornings. In fact, he once bought a 10-pound can of baked beans for himself because “they were the best deal per ounce” and “who wouldn’t want that many beans!?”

So, when Andy saw Bridget and Julia making these beans, he was interested right away. I wasn’t opposed to the dish (I mean, there’s brats and bacon in it), but I didn’t catch all of the ingredients and steps during the TV episode. I didn’t write it down, so I moved on to other recipes.

Luckily for Andy, our PBS channel airs a lot of reruns, and we happened to catch the same episode again. This time, I took notes, and waited for the right time to make a batch of beans large enough to feed an army. Late January rolled around, and when I asked Andy what he wanted for his birthday, these beans were at the top of his list. I’m a big proponent of eating what you want for your birthday (even it’s boring vanilla ice cream), so I was all in for birthday beans.

Andy, of course, loved them. So did Arron and Karen. I enjoyed them too, and the four of us did our best to put a dent in 116 ounces of beans. In fact, we liked them so much that I made them a few weeks later to share with Janelle and Josiah (and all of the kids) too. They were a hit again, and even after feeding six adults and 12 children, we still had a decent amount left over. (To be fair, we also ate pork roast, mac and cheese, salad and bread that night, but still…) 

So, this makes a ton of beans, obviously. OK, not a literal ton, and maybe I should have realized that by the ingredient list, but still. It filled every inch of my 9″ x 13″ pan. It’s a good thing that I took Bridget’s advice and put the pan on a cookie sheet before it went in the oven, otherwise I’d been cleaning baked bean sauce off of the bottom of my oven.

It’s very obvious that this recipe comes from the Cook’s Country side of America’s Test Kitchen, instead of the Cook’s Illustrated side. First of all, it calls for canned beans. And not just cans of plain beans. You use two cans of prepared baked beans and a can of Ro-tel. Then there’s the sauce. It’s part ketchup and part prepared barbecue sauce, plus some spices and other items. Finally, it’s super easy to put together, which, as most people know, is not always the case with recipes from CI.

Easy beans with lots of brats and bacon? That’s a birthday win for sure.

BBQBeans

Backyard Barbecue Beans 

1 1/4 pounds of bratwurst, casing removed
2 onions, chopped
2 28 ounce cans of baked beans (CC used Bush’s; I’ve used both Bush’s and Aldi’s baked beans with good results.)
2 15 ounce cans of pinto beans, rinsed and drained
2 15 ounce cans of cannellini beans, rinsed and drained
1 10 ounce can of Ro-Tel tomatoes
6 slices thick-cut bacon

For the sauce: 
1/2 cup ketchup
1/2 cup prepared barbecue sauce
1/2 cup water
2 tablespoons spicy brown mustard
2 tablespoons apple cider vinegar
1 teaspoon garlic powder
1/4 teaspoon cayenne pepper
1 teaspoon liquid smoke

Brown the brats in a 12″ skillet (you guessed it; I used my Lodge again), breaking up the pieces with a wooden spoon. When the meat is almost completely browned, add the onions to the pan and cook until both the onions and the brats are nice and brown.

While the brats and onion are browning, cut the bacon into 1″ pieces and set them aside. Preheat your oven to 350°.

Whisk the sauce ingredients together in a large mixing bowl. Add the brats and onions to the bowl, and stir to combine. Add the Ro-Tel and the beans to the bowl, and gently stir to combine all of the ingredients.

Pour the bean mixture into a straight-sided 9″ x 13″ metal baking pan. (Trust me on this one. Your glass 9″ x 13″ Pyrex dish will not have enough room for all of the beans, meat, and sauce.) Lay the bacon pieces over the top of the beans in an even, single layer. (It always looks like there won’t be enough bacon to cover the entire pan, but it’s worked out perfectly both times I’ve made this. Trust the source.) 

Place the baking pan on a rimmed baking sheet, and baked for 90 minutes. Remove the pan from the oven and let cool 15 minutes before serving.

From Cook’s Country

Click here for a printable version.

Brought to you by Cook’s Illustrated

Andy was worried when he saw this recipe on the dinner menu. Not because he doesn’t like barbecued chicken (especially barbecued chicken with bacon!), but because it was a Cook’s Illustrated recipe. In his mind, that could only mean one thing: We were going to eat dinner at 8 p.m. I told him that it didn’t look too involved, and, by the way, there’s bacon in it, but he was still skeptical. When I told him that the side dishes were CI recipes too, he revised his original estimate. Forget eating at 8 p.m. Dinner wasn’t going to be ready until 10.

I suppose I can’t blame him too much for jumping to that conclusion, especially after my other CI experiences. I’m not completely unrealistic though. I stuck with easy side dishes – “Perfect Boiled Sweet Corn” and “Sauteed Swiss Chard.” And yes, true to form, dinner did take a little while, but it wasn’t ridiculous. We ate well before 10 p.m. Plus, I got to use my new food processor, so that was fun. 🙂

The chicken cubes are tossed with salt while you make the sauce and prepare the bacon paste. Yes, I said bacon paste – raw bacon is whirled through the food processor and then mixed with sugar and paprika. The chicken chunks are coated with the paste before being threaded onto the skewers. They’re brushed with sauce and grilled to perfection. Using thighs instead of breasts helps keep the chicken moist, and the sauce is sweet and tangy, all at the same time. It’s a definite keeper here.

bbq-chicken-kabobs
We did have sweet corn with dinner too, but it didn’t last long enough for the picture. 

Barbecued Chicken Kabobs

For the sauce:
½ cup ketchup
¼ cup light or mild molasses (I used whatever molasses was in my pantry, so it was a little darker than they recommended.)
2 tablespoons grated onion (I used the large holes on the side of my box grater.)
2 tablespoons Worcestershire sauce
2 tablespoons Dijon mustard
2 tablespoons cider vinegar
1 tablespoon light brown sugar

For the chicken kabobs:
2 pounds of boneless, skinless chicken thighs, trimmed of excess fat and cut into 1″ cubes
2 teaspoons kosher salt
2 tablespoons sweet paprika
2 teaspoons smoked paprika
4 teaspoons sugar
2 slices of bacon, cut into 1/2″ pieces

To make the sauce, combine all ingredients in a medium saucepan. Cook over medium heat, stirring occasionally, until the mixture thickens to a ketchup-like consistency and has reduced to about one cup. Remove the sauce from the heat and transfer about 1/2 cup to a small bowl to serve with the chicken. Reserve the remaining sauce for brushing on the skewers.

To prepare the chicken, place the chicken cubes in a large bowl and toss with salt. Cover with plastic wrap and refrigerate 30-60 minutes.

While the chicken is chilling, prepare the bacon paste. Mix the sugar and paprika together in a small bowl and set aside. Place the bacon in the bowl of a food processor and process until the bacon becomes a smooth paste, about 30-45 seconds. Scrape the bowl down twice during the process. Mix the bacon paste into the sugar-spice mix. (This is my deviation from the recipe – I see that CI says to mix the bacon in with the chicken and then add the sugar-paprika mix. I think either would work.) 

Prior to threading the chicken on the skewers, preheat the grill to high for at least 15 minutes.

Remove the chicken from the fridge and pat the pieces dry with a paper towel. Add the bacon paste to the chicken and mix until all pieces are thoroughly coated. Thread the chicken onto skewers, rolling or folding pieces as necessary to keep them all in 1″ cubes.

To grill the chicken, turn one of the burners off (on a gas grill) and leave one on high. Place the skewers on the lit side of the grill. Grill the skewers, turning them one quarter turn every 2 1/2 minutes, until they are well-browned and slightly charred, moving the skewers to the cool side of the grill if flare-ups occur. Brush 1/4 cup of sauce on the top of the skewers, then flip and cook until the sauce is brown in spots, about 1 minute. Brush the second side of the skewers with the remaining 1/4 cup of sauce and flip again, cooking until the sauce is brown in spots, about another minute. The chicken should read 175° on an instant thermometer (if you used thighs; breasts will read 160°). Remove the skewers from the grill and allow them to rest for 5 minutes. Serve with reserved sauce.

From Cook’s Illustrated, May 2011

Click here for a printable version.

Sweet Potatoes and Bacon!

So, things have been a little dessert-heavy around here lately. I feel like that always seems to happen this time of year. Our CSA is still a few months away, and it’s not light enough in the evenings to get any decent pictures of dinner. And, let’s be honest, I’ve kind of been on a dessert kick, and I don’t see that ending any time soon. In an attempt to keep things balanced, I figured I’d talk about the sweet potatoes that I made for our Easter dinner. 😉

I actually first made these for Friendsgiving. I spent a lot of time flipping through cookbooks and magazines, searching for the perfect dishes to round out the menu. Sweet potatoes aren’t usually my first choice when it comes to sides (mostly because I like white potatoes better), but when I saw the picture in the Thanksgiving issue of Southern Living, I was immediately interested. And with good reason, too. I mean, there’s bacon, after all. Do I really need to say more?

Fine. It’s also super easy, AND it cooks in the crock pot. This means that you can get the potatoes going before church and come home to a great lunch, or free up stove / oven space during a big meal. Of course, it’s one of those crock pot recipes that only cooks for 4 hours, so unless you have one of those fancy crock pots with a timer, it’s not ideal for a workday meal.

Frozen concentrate isn’t an ingredient that I typically have on hand, but since the unused portion keeps well in the freezer (obviously), I figured  I could just use keep the extra for another batch. As long as we liked them, anyway. Which we did. So much so, in fact, that I made the full batch for Easter, even though it was just the two of us.

CrockpotSweetPotatoes
The picture won’t win any food blogger photo awards, but you can only take pictures for so long before you give in and eat the food. 🙂


Slow-Cooker Sweet Potatoes with Bacon

4 lbs. sweet potatoes, peeled and cut into 1″ thick slices
1/2 cup frozen orange juice concentrate, thawed
4 tablespoons butter, melted
3 tablespoons light brown sugar
2 teaspoons kosher salt
2 teaspoons chopped fresh rosemary
2 teaspoons cornstarch
1 tablespoon cold water
1/2 cup loosely packed fresh parsley leaves, finely chopped
1 tablespoon orange zest
2 garlic cloves, finely minced
3 cooked bacon slices, crumbled

Place the sliced sweet potatoes in a 5-6 quart crock pot.

Mix the concentrate, butter, brown sugar and salt together and pour the mixture over the potatoes. Stir the potatoes until they are well-coated with the butter/sugar/concentrate mixture.

Place the lid on the crock pot and cook on low for about 4 hours, or until potatoes are tender. (The original recipe says to cook for 5-6 hours, but I found that the longer time turned the potatoes into mush. Maybe my crock pot runs hot?) 

When the potatoes are tender, use a slotted spoon to transfer them to a serving dish. Whisk the cornstarch and water together, and then whisk it into the juice in the bottom of the crock pot. Turn the crock pot temperature to high and cook, whisking constantly, until the mixture thickens, about 3 to 5 minutes. Pour the sauce over the potatoes.

In a small bowl, combine the parsley, orange zest and garlic. Sprinkle the parsley mixture over the potatoes and top with the crumbled bacon. Serve warm.

From Southern Living, November 2015

Click here for a printable version.

My Kind of Comfort Food

We’ve been enjoying some unseasonably warm weather here in Wisconsin. Sunny days in the 60s aren’t typical in November, but I didn’t hear anyone complaining. However, all good things must come to an end, and it looks like things are headed back to “normal.” Not that normal is bad by any means. Living somewhere with four seasons is one of my favorite things about living in the Midwest.

Comfort food is another one of my favorite things about fall, and I made this dish on a very typical late fall day – cool, cloudy and rainy. Andy had spent the entire afternoon working outside (raking the leaves, washing and waxing the car, mowing the lawn), and even though I was feeling lazy, I didn’t think I should tell him to make a peanut butter sandwich for dinner. 🙂 So I went ahead and tried a recipe that one of my coworkers shared with me a couple weeks beforehand.

He raved about the recipe. “It will make squash edible!” With that ringing endorsement, I took a copy of the recipe but told him I’d probably make some tweaks, especially since the original recipe called for eight ounces of mushrooms. “You can’t omit the mushrooms,” he said. “They make the dish!” Umm… not in our household. Caramelized onions, on the other hand, are something I can get behind. I added an extra slice of bacon (because more bacon is always better), and I roasted the squash on the bacon pan, rather than microwaving it. Not only was the oven already on, but I figured that roasting the squash (especially in bacon grease) would give things even more flavor. I used my cast iron skillet to caramelize the onions and make the sauce, and since it was already dirty, decided that it would be the perfect pan to finish baking the dish.

Wow. The squash was more than edible; it was amazing. The flavors came together in the perfect way. We ate half of the pan for dinner, and I seriously contemplated warming up the leftovers for breakfast the next morning. And it’s safe to say that the rest of our butternut squash may not be destined for soup after all.

ButternutsquashPasta
If I was a better food blogger, I’d have a much more appetizing picture to share. But it was dark and we were hungry, so I snapped this one with my phone and dug in.


Baked Butternut Squash Pasta

1 medium butternut squash, peeled and cubed (Approximately 3-5 cups of squash. The recipe called for three cups; my squash yielded closer to 5, and I used every bit of it.) 
1 large onion, thinly sliced
8 ounces short pasta
2 tablespoons of butter, divided
1 cup milk
2 tablespoons AP flour
4 green onions, thinly sliced, white and green parts separated
5 ounces Fontina cheese, shredded
3 slices of bacon
2-3 sprigs of fresh thyme
coarse salt and pepper to taste

Preheat the oven to 375 degrees. Line a rimmed baking sheet with foil and place the uncooked bacon on the sheet. Bake bacon until it is crispy, then remove the pan from the oven and allow the bacon to cool on paper towels.

If your bacon left an overabundance of grease on the baking pan, drain off a little. Spread the squash cubes on the bacon pan. Place the thyme sprigs on the squash and season the pan generously with freshly ground black pepper. Roast until the squash is tender, about 20 minutes.Remove the squash from the oven. Place the squash in a large mixing bowl and lightly mash with a fork.

While the squash is cooking, melt one tablespoon of butter in an oven-safe skillet. Place the onion slices in the butter and season with salt and pepper. Cook over medium to medium low heat until the onions are caramelized. Remove the onions from the pan and transfer the onions to the bowl with the squash.

Meanwhile, bring a large pot of salted water to a boil. Cook the pasta according to the package directions, then drain and set aside.

Melt the remaining butter in the skillet and saute the white parts of the green onions. When the onions are tender, add the flour and cook, stirring often, for a minute. Slowly pour the milk into the skillet, whisking constantly. Keep whisking the mixture until it has cooked and thickened. Remove the pan from the heat.

Pour the sauce over the squash and onion mixture and stir to combine. Gently fold in the cooked pasta.

Spoon/pour about half of the squash/pasta/onion mixture into the bottom of an oven safe skillet or casserole dish. Sprinkle with half of the shredded fontina cheese. Add the rest of the squash/pasta mixture to the pan and top with the remaining cheese, bacon pieces and green onions.

Bake, uncovered, for 20 minutes, or until the dish is heated through and the cheese is bubbly. Serve warm.

Adapted from Better Homes and Gardens, courtesy of my coworker, Rich

Click here for a printable version.

Onions & Bacon – What Could Be Better?

Let’s get something out of the way, right off the bat: I don’t make a lot of dips. It’s not that I don’t like them; it’s that I like them too much. You see, I can make dinner out of a pile of chips/bread/pretzels and whatever dip happens to be nearby (salsa, guac, hummus, spinach artichoke dip… you get the idea). So what’s the problem, you ask? Well, Andy doesn’t like dip. (Not even queso! It’s melty cheese! What’s not to love?) And while I am perfectly capable of eating an entire batch of dip, I’m also trying to be a responsible adult here and exercise some self-control.

However, a few weeks ago, I decided that I WANTED DIP. I was going to make this caramelized onion dip that had been teasing me for months. And since we had friends coming over for a movie night, I knew that I wouldn’t have to eat the entire bowl myself. Andy was pretty disappointed when he discovered that the caramelized onions and the bacon were destined for dip, rather than dinner. He mourned the “waste” of such perfectly good ingredients and tried to “save” some of the onions from being smothered in sour cream. (So noble, right?)

I halved the original recipe (out of necessity – somehow, I only had a scant cup of sour cream in the fridge), which gave me a manageable amount of dip for three dip lovers and one dip hater (who did try a few bites and deem it “not terrible”). One of the best things about this dip (besides how good it tastes, both on chips and on a spoon…) is the way it makes your house smell while you’re prepping the ingredients. Onions caramelizing and bacon cooking are up there with fresh bread on my “favorite smells” list. And, like most dips, it’s easy to make, which is a good thing. Especially when the resident dip hater decides that caramelized onions and bacon make dip acceptable, which means you’ll need to make it more often. 🙂

Caramelized Onion Dip

Caramelized Onion & Bacon Dip 

1/2 cup caramelized onions
3 slices of bacon, cooked until crisp and crumbled into pieces
2 scallions, thinly sliced, some greens reserved for garnish
1/2 teaspoon apple cider vinegar
pinch cayenne pepper
1 cup sour cream
salt and pepper to taste

In a medium bowl, stir the onions, bacon, sour cream, vinegar, cayenne and scallions together. Taste the dip, then season with salt and pepper as necessary. Top with reserved onion greens and cover the bowl with plastic wrap. Chill the dip in the refrigerator for at least 20 minutes. Serve with your favorite chips (I used pita chips).

From Smells Like Home, who adapted it from The Cook’s Illustrated Cookbook.

Click here for a printable version.
 

Why Didn’t I Think of This Before?

I didn’t plan on writing about these. In fact, they weren’t even on my mind when I put the potatoes in the oven. Potato skins (tasty as they are) are one of those things that I don’t make at home. In my mind, they’re one of those things that you order with wings when you’re out at your favorite sports bar. But then, as I was preparing my favorite potato soup, I noticed that I had a giant pile of potato skins. Lightly salted, cooked potato skins. Perfect for topping with cheese and bacon.

Why hadn’t I noticed this before? (Think of all of the missed opportunities!) 

Since I made this up on the fly, these aren’t exact measurements. Call it a guideline, rather than a recipe. I’m including my baking directions, but if you have a baking method that you prefer, by all means, use that. The goal is to have baked potatoes that are cool enough to handle so you can de-skin them. Once the potatoes are baked and skinned, it comes together very quickly. Perfect for Sunday afternoon snacking, if you ask me.

Potato Skins


Baked Potato Skins

5 large white potatoes
olive oil
kosher salt
shredded cheddar cheese
green onions, sliced
fresh parsley, finely chopped
bacon, cooked and crumbled

Preheat oven to 375 degrees. Scrub the potatoes and lightly prick them with a fork. Place potatoes on a baking sheet and lightly drizzle them with olive oil. Sprinkle the potatoes with salt and bake until tender, about 1 hour. Remove the potatoes from the oven and let them cool until you can handle them. (I used my oven’s “time bake” feature for this. I popped the potatoes in the oven before church, set the timer, and came home to perfectly done spuds. It’s almost as good as the crockpot for hands-off effectiveness!) 

When the potatoes are cool, slice them in half and gently peel the skins away from the cooked potato. Reserve the potato for another use. (May I suggest soup?)

Arrange the potato skins in a single layer on a baking sheet. Sprinkle with cheddar cheese, green onions, parsley and bacon. Broil until skins are crispy and cheese is melted and bubbly. Remove from oven and serve immediately.

A Beth’s Blue Plate Original

Click here for a printable version.

Cooking Club Win!

The theme for our most recent “cooking club” evening was appetizers, which meant that I had lots of possible recipes to chose from. There’s the avocado feta hummus. Or the avocado lemon feta dip. Or the sweet potato discs with pecans and cranberries (and since I’m not crazy about goat cheese, I’d swap it out for, you guessed it, feta). And those are just the recent additions to the list.

Thanks to some crazy schedules (and some last-minute planning), I knew I didn’t have time to fit in a stop to buy avocado, feta, or sweet potatoes. So I decided that bread could be an appetizer. I mean, you eat it while you wait for your meal to come at a fancy restaurant, right? (OK, so maybe that’s fancy bread that you dip in balsamic and olive oil, but just go with me on this, mmmk?)

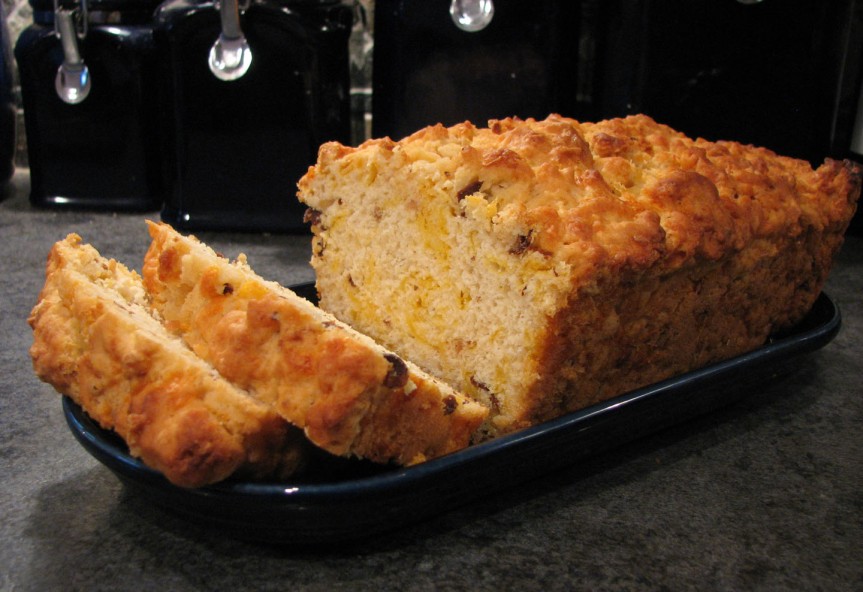
What we have here is a cheesy, bacony loaf of deliciousness. It smelled fantastic while it was baking, and it tasted good too. (It had cheese and bacon. How could it not??) Its’a quick bread, which meant no monkeying around yeast and letting the dough rise. It was good on its own, and it wasn’t bad with apple butter either.

I have to admit, the directions for this one weirded me out just a bit. Pour the melted butter in the bottom of the loaf pan? Add the dough and pour the bacon grease on top? I was convinced that I was going to end up with a greasy, soggy mess. But amazing things must have happened inside my oven, because the finished product wasn’t greasy OR soggy.

Amazing things indeed. After all, we’re talking about bacon, cheese and beer. In bread. The finished product didn’t last long at all.
Bacon Beer Cheese BreadBacon Beer Cheese Bread

6-7 slices of bacon, cooked until crisp and crumbled, drippings reserved (The original recipe called for 6 thick slices, but my bacon was on the thin side, so I went with 7.) 
3 cups of all-purpose flour
1/4 cup sugar
1 tablespoon baking powder
1/2 teaspoon salt
4 ounces shredded cheddar cheese
1 12-ounce bottle of beer
4 tablespoons unsalted butter, melted
2 tablespoons reserved bacon grease

Preheat oven to 350. Butter a 9″ x 5″ loaf pan.

Stir the flour, sugar, baking powder and salt together in a large mixing bowl. Add the cheese and crumbled bacon and stir to combine. When the cheese and bacon are evenly mixed into the flour, pour the beer into the bowl. Stir the mixture with a large spoon until it comes together.

Spoon/pour the batter into the prepared loaf pan. Spread it evenly in the pan and drizzle the melted butter and bacon grease over the top of the loaf.

Bake until a knife inserted into the center of the loaf comes out clean, about 50-60 minutes. Remove the pan from the oven and allow it to cool on a wire rack. After 10-15 minutes, you can flip the loaf out of the pan.

Slice and serve. Cover leftovers (what?) with plastic wrap and store at room temperature.

From Brown Eyed Baker, who adapted it from the Novice Chef

Click here for a printable version.


Pizza Win!

I’ll admit, I’ve been slacking off the last few weeks. First Andy was out of town, and then we had out-of-town guests, then we took a mini-vacation, and then things got busy for me at work. All of that translates to almost no time to blog (although, thankfully, there has still been time to make dinner).

In the middle of that whirlwind, I was able to finally take a road trip with some girlfriends to the nearest Trader Joe’s. I figured it was time to see what all of the fuss was about. (It’s about a two-hour drive to get there from my house, and I know people who make the pilgrimage trek trip regularly. I needed to know why.) I have to say, I wasn’t blown away. I did pick up some orecchiette (since I have a hard time finding it for a reasonable price at my standard grocery store) and a couple other items (dried apricots and roasted red peppers), but overall, I was underwhelmed.

The real “win” of the Trader Joe’s trip (aside from the quality time with some of my all-time favorite people) was the asparagus. It was decently priced, and since I am SO ready for spring, I bought a bunch. And thanks to a fantastic pizza that we had in Bayfield (Brie, caramelized onions, roasted red peppers and chicken, anyone?), I couldn’t stop thinking about a pizza with caramelized onions. How about a shaved asparagus pizza with caramelized onions? With bacon too, because, well, it’s bacon. Who’s with me? 🙂

I’d made an asparagus pizza once before, with my usual hand-tossed style crust, and I felt like it was too much crust. So, this time around, I decided to try a thinner crust, and while I’m typically a more-bread-is-better girl, I felt like the thin crust was just what this pizza needed. (Does this mean there’s room in my life for more than one kind of pizza crust? What’s next? More than one chocolate chip cookie?)

I don’t know if it was the onions, the crust, the bacon or some magical quality in the Trader Joe’s asparagus, but the pizza was an all-out success. As in, the best thing we ate all week. Maybe I need another road trip. 😉

asparagus pizza

Shaved Asparagus Pizza with Bacon and Caramelized Onions

For the crust: 
1/2 cup warm water
1 1/4 teaspoons active dry yeast
1 1/2 cups/190 grams all-purpose flour
1 teaspoon salt
olive oil for the bowl and pizza pan
cornmeal for the pizza pan

For the toppings:
1 large yellow onion, thinly sliced
1 tablespoon unsalted butter
1 tablespoon and 1 teaspoon olive oil, divided
pinch of salt
pinch of sugar
1/2 lb. fresh asparagus spears
4 slices of bacon, cooked until crisp and crumbled
4 ounces of mozzarella cheese, shredded
1/2 ounce shredded Parmesan cheese

Preheat oven to 200 degrees, and then turn the oven off, keeping the door closed to retain the oven temperature.

Pour the warm water into the bowl of a stand mixer and sprinkle the yeast on top of the water. Let the mixture stand until the yeast is dissolved and foamy, about 10 minutes. Add the flour and the salt to the bowl and attach the bowl to the mixer. Using the dough hook, mix the dough on medium speed until it comes together in a large mass. Increase the speed to medium-low and knead until the dough is smooth and elastic, about 5 minutes. Take the dough out of the bowl and wipe out the mixing bowl. Brush some olive oil in the mixing bowl and return the dough to the bowl.

Cover the mixing bowl with plastic wrap and place in the warmed oven. Allow dough to rise until doubled, about 30 minutes.

While the crust is rising, prepare the toppings. Melt the butter and one teaspoon of olive oil in a large, heavy skillet. When the butter has melted, add the onion slices, salt and sugar.  Cook the onions over medium low until the onions are soft, golden brown and caramelized, only stirring occasionally.

Meanwhile, “shave” the asparagus. Hold the large end of the asparagus and run a vegetable peeler down the length of the stalk, creating thin ribbons. (Some of mine were thinner than others, and it all worked out OK.) Discard the tough, woody ends of the asparagus stalk.

When the dough has risen, remove it from the oven and preheat the oven to 425. Lightly oil a pizza pan with olive oil and sprinkle with cornmeal. Stretch the dough out into a 12″ round and brush the crust with about a tablespoon of olive oil. Spread the caramelized onions all over the crust. Pile the asparagus ribbons on top of the onions. Sprinkle with the crumbled bacon, and then cover the pizza with the mozzarella cheese. Top with the Parmesan cheese.

Bake until crust is golden and cheese is melted, bubbly and browned, about 15 minutes. Remove from oven, slice into wedges and serve immediately.

Crust from the Smitten Kitchen Cookbook, toppings inspired by the Smitten Kitchen Cookbook and Maggie’s in Bayfield, Wis.

Click here for a printable version.

Brussels. Bacon. Cheese.

I don’t remember eating Brussels sprouts as a kid. Maybe my mom didn’t make them, or perhaps I’ve just repressed that memory. 😀 So, when we received a stalk of Brussels sprouts in our CSA last fall, I was at a loss for how to prepare them. My M.O. for “strange” or “possibly unlikable” vegetables is to roast them. I’m pretty sure you could toss just about anything with olive oil, garlic, salt and pepper, roast it for 20 minutes and have it taste good. Especially if you hit the final product with some lemon juice and Parmesan cheese before you dig in.

That’s what I did with those first sprouts. Then I saw this recipe for roasted Brussels sprouts with blue cheese. Roasted sprouts with melty, creamy, tangy cheese? Sign me up. But then, I started thinking about how much better those sprouts would be with some bacon. Smoky, salty bacon. (Bacon is Andy’s suggestion for nearly every savory dish. “It’s good, but it’d be better with bacon.”)

And better it was. The outer leaves of the sprouts crisped in the oven, and the cheese melted into delicious strings puddles pockets studded with bacon crumbles. Most of the sprouts didn’t even make it to our plates – we gobbled them straight from the serving dish. I’d even go so far as to say it’s the best side dish I’ve made in a long time. In fact, it gets 10 stars on our dinner scale – a scale that only goes up to 5.

BaconBlueCheeseSprouts

Bacon Blue Cheese Brussels Sprouts

3 strips of bacon, cooked until crisp and crumbled
1/2 lb. Brussels sprouts
1 tablespoon olive oil, plus extra for the pan
salt and freshly ground black pepper
1 ounce blue cheese crumbles

Preheat oven to 400 degrees. Brush a rimmed baking sheet with olive oil.

Wash the Brussels sprouts and trim the stems off the base of the sprouts. Halve the Brussels sprouts and place in a large mixing bowl. Drizzle olive oil over sprouts and toss with with oil, salt and pepper. Spread Brussels sprouts on the baking sheet.

Roast until sprouts are golden brown and centers are tender, about 20 minutes. Remove tray from oven and sprinkle with blue cheese and bacon crumbles. Stir the sprouts with a spatula to evenly distribute the cheese and bacon among the sprouts. Return the tray to the oven and bake for an additional 2-3 minutes, or until cheese is fully melted.

Serve immediately.

Adapted from An Apple a Day, originally from Nicole Morrissey’s “Prevention RD’s Everyday Healthy Cooking”

Click here for a printable version.


Back in the Swing of Things

I’ll be the first to admit that I couldn’t wait to get back into my kitchen after vacation. Having all of my knives, my oven AND running water was like a dream come true after two weeks of boiling water over a camp stove before washing the dishes.

This chowder was the first new dish I made after we got back. I’d had it on my “to try” list for quite a while, but somehow, I never got around to actually making it. (Probably because we devour our sweet corn before it has a chance to become an ingredient.) And since we came home to some very fall-like weather, soup seemed like the perfect way to get back into the kitchen. Let’s do a quick recap of what this recipe has going for it:

  1. It uses up stray CSA ingredients. (We only had three ears of sweet corn… this kept us from fighting over who would get the third ear.) 
  2. It’s quick and easy.
  3. It’s filling, without being too heavy of a soup. I only made half a batch (which is what I’m sharing below), and we got two days’ worth of lunches out of the deal!
  4. It knocks one more recipe off my ever-growing “things to try” list.
  5. BACON. Enough said. 😀

ShrimpChowder

Corn & Shrimp Chowder with Bacon

3 ears of sweet corn, husked
4 slices of bacon (OK, so I used the full amount of bacon. That just ensures that there will be 2 slices to actually go in the soup, since it’s inevitable that some will mysteriously disappear before the soup is done.) 
4 scallions, thinly sliced, green and white parts separated
2 medium red potatoes, cut into 1/2″ chunks
2 tablespoons flour
1 1/2 cups milk
1/2 teaspoon Old Bay
1/4 teaspoon dried thyme
1/2 pound large uncooked shrimped, peeled and deveined
salt and pepper, to taste

Stand an ear of corn up in a large, wide bowl. Using a paring knife, cut the kernels off the cob. When the kernels have all been sliced off, take a spoon and scrape the pulp into the bowl. Repeat with the remaining ears of corn.

In a large saucepan or stock pot, cook the bacon slices until crisp. Remove from the pan and allow to drain on a paper towel. Crumble slices into bite-sized pieces.

Drain off some of the bacon grease, leaving about two tablespoons in the bottom of the pan. Add the white parts of the scallions and the chopped potatoes to the pan with the bacon grease and cook over medium high heat. Cook until potatoes begin to soften, about 3-4 minutes, stirring occasionally. Add the flour and cook, stirring constantly, for 2-3 minutes, or until it begins to brown (but not burn).

Pour the milk into the saucepan, whisking constantly. Stir in 1 cup of water, the Old Bay and thyme. Bring the mixture to a boil, then reduce to a simmer. Simmer until potatoes are cooked, about 10 minutes.

Add the corn, shrimp and scallion greens to the pot. Cook until shrimp are opaque and cooked through, about 3 minutes. Season with salt and pepper to taste. Remove pan from heat. Ladle soup into bowls and serve garnished with bacon pieces.

From Everyday Food, July 2009

Click here for a printable version.